Automated Trade Execution Pipeline for Crypto Bots: From Trading Signal to Live Order Execution
Learn how to build an automated trade execution pipeline for crypto bots using Python, APIs, risk management, and live order automation
Automated Trade Execution Pipeline for Crypto Bots: From Trading Signal to Live Order Execution
Imagine spending six months building a profitable crypto trading strategy.
Your backtests look incredible. The Sharpe ratio is strong. Drawdowns are manageable. The equity curve climbs like a staircase.
Then you deploy it live.
Suddenly, trades execute late. Orders partially fill. Slippage destroys your edge. Your bot buys during exchange latency spikes and exits after the market already moved.
Within two weeks, your “profitable” strategy becomes unprofitable.
This is the hidden reality most beginner algorithmic traders discover too late:
A strategy is only as good as its execution pipeline.
Many traders obsess over indicators, machine learning models, or entry signals while ignoring the infrastructure responsible for actually converting trading decisions into live exchange orders. But in real markets — especially crypto — execution quality can matter more than signal quality.
A mediocre strategy with elite execution often outperforms a brilliant strategy with poor execution.
In this guide, you’ll learn how professional automated crypto trading systems transform raw market data into reliable live trades through a complete automated trade execution pipeline.
By the end of this article, you will understand:
- How execution pipelines work end-to-end
- The architecture behind professional crypto bots
- How orders flow from signal generation to exchange execution
- Common execution mistakes that ruin profitability
- How latency, slippage, and risk controls affect live trading
- How to structure your own Python-based trading infrastructure
Most importantly, you’ll learn how to think like a systems engineer instead of just a strategy tester.
Why Most Crypto Bots Fail in Live Markets
Here’s a painful truth:
Backtests assume perfect execution.
Real markets do not.
A backtest may assume your order fills instantly at exactly the closing price of a candle. But in live crypto markets:
- Liquidity changes every second
- Spreads widen unexpectedly
- Exchanges throttle APIs
- Network delays occur
- Partial fills happen
- Volatility spikes destroy execution timing
This difference between simulated trading and live execution is called execution drift.
Mathematically, the difference can be described as:
Even tiny execution drift compounds over hundreds of trades.
For high-frequency or short-term strategies, execution quality becomes critical because profit margins are often extremely small.
For example:
- A scalping strategy targeting profit per trade may completely fail if slippage averages
- A latency-sensitive breakout strategy may enter after the move already happened
- A mean reversion strategy may buy during a liquidity vacuum
This is why professional algorithmic trading firms invest enormous resources into execution infrastructure.
And surprisingly, beginner crypto traders can implement many of these concepts too.
What Is an Automated Trade Execution Pipeline?
At its core, a trade execution pipeline is the system responsible for moving trading decisions through multiple stages until an actual order reaches the exchange.
Think of it like an airport system.
A passenger doesn’t instantly teleport onto an airplane.
They move through:
- Identity verification
- Security checks
- Boarding systems
- Flight coordination
- Final departure
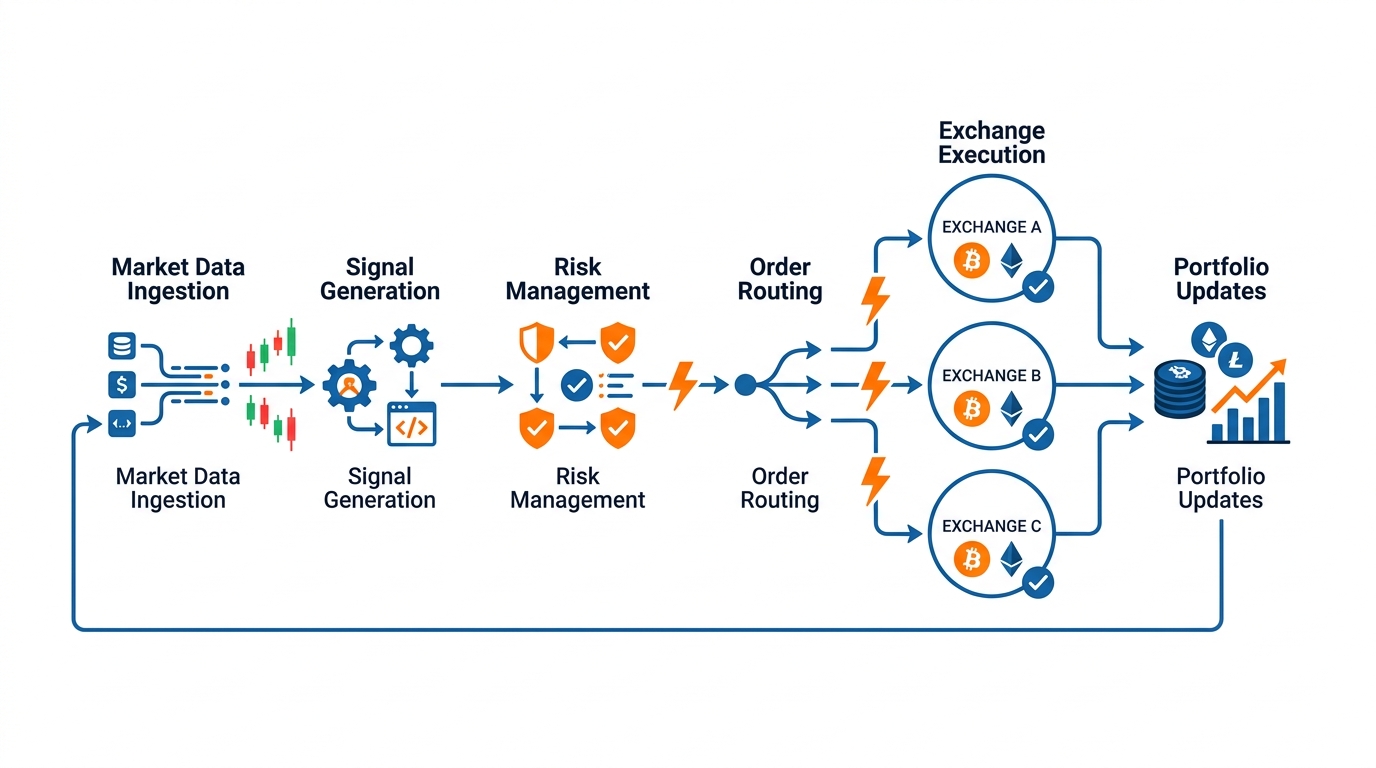
Similarly, a trading signal moves through several layers before becoming a live trade.
A typical crypto bot execution pipeline includes:
- Market Data Collection
- Signal Generation
- Strategy Validation
- Risk Management
- Position Sizing
- Order Construction
- Exchange API Submission
- Fill Monitoring
- Logging and Monitoring
- Portfolio Updates
Each stage exists because something can go wrong.
And in live markets, something eventually will.
Step 1: Market Data Collection — The Foundation of Every Trading Bot
Before a bot can trade, it must understand the market.
This sounds obvious, but poor market data handling is one of the biggest reasons trading systems behave unpredictably.
Your execution pipeline begins with collecting:
- OHLCV candles
- Order book data
- Trade ticks
- Funding rates
- Open interest
- Liquidation data
- Spread information
The type of data you collect depends on your strategy.
For example:
- Swing trading strategies may only need 1-hour candles
- Scalping systems may require millisecond-level tick data
- Market-making bots require real-time order book depth
Most crypto bots collect data through exchange REST APIs or WebSocket streams.
REST APIs are useful for slower polling tasks.
WebSockets are essential for low-latency live updates.
Why Data Quality Matters More Than Most Traders Realize
A strategy operating on delayed or corrupted data becomes dangerous.
Imagine your bot receives stale prices during a volatility spike.
Your system might:
- Buy after the move is already over
- Fail to close losing positions
- Miscalculate spreads
- Trigger false signals
Professional systems validate incoming data continuously.
Some common checks include:
- Missing candles
- Timestamp consistency
- Duplicate ticks
- Abnormal spreads
- Sudden price gaps
A simple validation formula might look like:
If this exceeds a predefined threshold unexpectedly, the data may be flagged.
Step 2: Signal Generation — Where Strategy Logic Lives
Now comes the exciting part.
Your strategy generates a trading signal.
This can involve:
- Technical indicators
- Statistical arbitrage
- Machine learning
- Smart money concepts
- Momentum detection
- Mean reversion logic
For example, a simple EMA crossover strategy may use:
EMA_{t}=\alpha P_{t}+(1-\alpha)EMA_{t-1}
When a fast EMA crosses above a slow EMA, the bot generates a long signal.
But here’s what beginners miss:
A signal is NOT a trade.
A signal is merely a suggestion.
The execution pipeline must decide whether the signal deserves capital allocation.
Example Python Signal Generator
The following code calculates two exponential moving averages and generates buy signals.
1import pandas as pd
2
3df["ema_fast"] = df["close"].ewm(span=20).mean()
4df["ema_slow"] = df["close"].ewm(span=50).mean()
5
6df["signal"] = 0
7
8df.loc[df["ema_fast"] > df["ema_slow"], "signal"] = 1
9df.loc[df["ema_fast"] < df["ema_slow"], "signal"] = -1
This code matters because it transforms raw price data into actionable trading intent.
The output creates:
- 1 for bullish signals
- -1 for bearish signals
- 0 for neutral conditions
But professional pipelines rarely execute trades directly from this stage.
Additional layers come first.
Step 3: Risk Management — The Layer That Saves Accounts
Many beginners think risk management means “using stop losses.”
Professional systems treat risk management as a full decision engine.
Before a trade executes, the system asks questions like:
- Is volatility too high?
- Is daily drawdown exceeded?
- Is correlation exposure excessive?
- Is liquidity sufficient?
- Is the spread acceptable?
- Is the account overleveraged?
This stage acts like a gatekeeper.
Even good signals can be rejected.
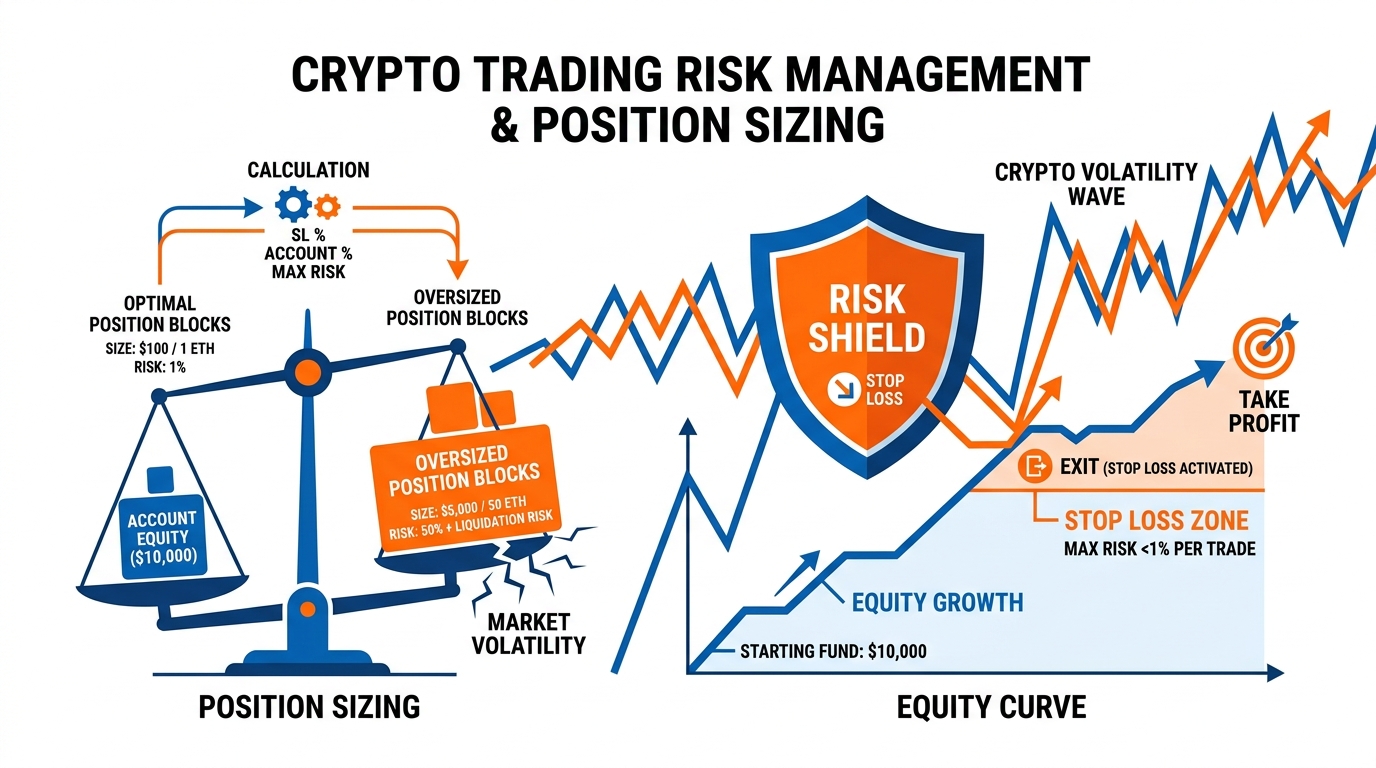
Position Sizing: The Most Underrated Skill in Trading
Imagine two traders using the exact same strategy.
One risks per trade.
The other risks per trade.
After ten losing trades:
- Trader A survives
- Trader B disappears
Position sizing determines survival.
One common formula is fixed fractional sizing:
For leveraged crypto trading:
Example Python Position Sizing Logic
This code calculates how large a trade should be based on account risk.
account_balance = 5000
risk_percent = 0.01
entry_price = 50000
stop_loss = 49500
risk_amount = account_balance * risk_percent
stop_distance = abs(entry_price - stop_loss)
position_size = risk_amount / stop_distance
1print(position_size)This protects the trading account from catastrophic losses.
If the stop-loss distance increases, the position size automatically decreases.
That adaptive behavior is critical during volatile crypto conditions.
Step 4: Order Construction — Translating Intent Into Exchange Instructions
At this stage, your system finally prepares an actual order.
This sounds simple.
It isn’t.
The bot must define:
- Order type
- Quantity
- Symbol
- Time-in-force
- Reduce-only settings
- Stop-loss parameters
- Take-profit rules
A single mistake here can create disastrous outcomes.
For example:
- Sending a market order instead of a limit order
- Using incorrect leverage
- Forgetting reduce-only on futures
- Submitting duplicate orders
Understanding Order Types in Crypto Trading
Different order types behave differently under volatility.
Market Orders
A market order executes immediately at the best available price.
Pros:
- Fast execution
- Guaranteed fill
Cons:
- High slippage risk
Limit Orders
A limit order executes only at a specified price.
Pros:
- Better pricing control
- Lower slippage
Cons:
- No fill guarantee
Stop Orders
Stop orders activate when price reaches a trigger level.
Used for:
- Stop losses
- Breakout entries
- Risk protection
Step 5: Exchange API Integration — Where Bots Meet Real Markets
This is where your trading infrastructure connects to exchanges like:
- Binance
- Bybit
- OKX
- Kraken
Most exchanges provide APIs allowing bots to:
- Place orders
- Cancel orders
- Retrieve balances
- Access market data
- Monitor positions
But APIs introduce operational risk.
Exchanges can:
- Disconnect unexpectedly
- Rate limit requests
- Return inconsistent data
- Experience downtime
Professional systems assume APIs will eventually fail.
Because they will.
Example Python Order Execution Using CCXT
The following code demonstrates how a bot submits a market order using the CCXT library.
1import ccxt
2
3exchange = ccxt.binance({
4"apiKey": "YOUR_API_KEY",
5"secret": "YOUR_SECRET"
})
order = exchange.create_market_buy_order(
symbol="BTC/USDT",
amount=0.01
)
1print(order)This code sends a live market order to the exchange.
The response typically includes:
- Order ID
- Fill price
- Executed quantity
- Fees
- Timestamp
This becomes part of your execution logs.
Why Latency Quietly Destroys Trading Strategies
Latency is the delay between decision and execution.
Even a delay of a few hundred milliseconds can matter in crypto.
The total latency pipeline can be represented as:
High latency causes:
- Worse fills
- Delayed entries
- Slippage increases
- Missed arbitrage opportunities
For fast-moving crypto assets, latency can determine profitability.
Step 6: Slippage Management — The Silent Profit Killer
Slippage is one of the most underestimated factors in trading.
It measures the difference between expected execution price and actual fill price.
Slippage=Expected\ Price-Actual\ Fill\ Price
Small slippage becomes devastating at scale.
For example:
- Expected entry:
- Actual fill:
Slippage:
Over 1,000 trades, this can completely erase profitability.
Causes of Slippage
Crypto markets experience slippage due to:
- Thin liquidity
- Sudden volatility
- Large order sizes
- Exchange congestion
- Slow execution
Practical Slippage Controls
Professional systems reduce slippage using:
- Limit orders
- TWAP execution
- VWAP execution
- Order slicing
- Smart routing
- Liquidity filters
Step 7: Fill Monitoring and Trade State Management
Submitting an order is not the end.
Now the bot must track what actually happened.
Orders can become:
- Filled
- Partially filled
- Cancelled
- Rejected
- Expired
A robust trading system constantly synchronizes exchange state with internal state.
This prevents:
- Duplicate positions
- Phantom orders
- Incorrect portfolio tracking
Example Trade State Machine
Professional systems often model trades using state machines.
Possible states:
PENDING → OPEN → PARTIALLY_FILLED → FILLED → CLOSED
This structure prevents logical chaos during live execution.

Step 8: Logging and Monitoring — Your Trading Black Box
Imagine waking up to a $4,000 loss.
Would you know why it happened?
Without proper logging, probably not.
Professional systems log everything.
Typical logs include:
- Signals generated
- Orders submitted
- API responses
- Latency measurements
- Errors
- Position updates
- Risk events
Logs transform debugging from guessing into analysis.
Example Python Logging System
The following code creates a simple execution log.
1import logginglogging.basicConfig(
filename="trading_bot.log",
level=logging.INFO
)
1logging.info("BTC long order executed at 50250")This creates a persistent record of trading activity.
When something fails, logs become your forensic evidence.
Step 9: Portfolio and Performance Tracking
A trading system must continuously track portfolio health.
This includes:
- Unrealized PnL
- Realized PnL
- Drawdowns
- Win rate
- Exposure
- Leverage usage
One critical metric is maximum drawdown.
Drawdown=\frac{Peak\ Equity-Current\ Equity}{Peak\ Equity}
Drawdown measures how far the account falls from its highest equity point.
A strategy with strong returns but catastrophic drawdowns may still be untradable psychologically.
The Hidden Psychological Advantage of Automation
Most traders think automation removes emotions entirely.
It doesn’t.
But it relocates emotional pressure.
Instead of emotional entries, traders now experience:
- Anxiety during deployment
- Fear during outages
- Panic during bugs
- Stress during live drawdowns
The difference is that automated systems create consistency.
A properly engineered pipeline executes rules objectively.
No hesitation. No revenge trading. No impulsive exits.
That consistency becomes a competitive edge.
Common Mistakes Beginner Algo Traders Make
1. Ignoring Slippage
Backtests without slippage assumptions are dangerous fantasies.
Always simulate realistic execution conditions.
2. Using Market Orders Everywhere
Market orders during volatility spikes can become extremely expensive.
3. No Risk Layer
A strategy without execution risk controls is incomplete.
4. No Retry Logic
Exchange APIs fail regularly.
Bots need automatic retry systems.
5. No Kill Switch
Professional systems include emergency shutdown mechanisms.
Examples:
- Max daily loss exceeded
- API instability detected
- Extreme volatility event
- Position mismatch
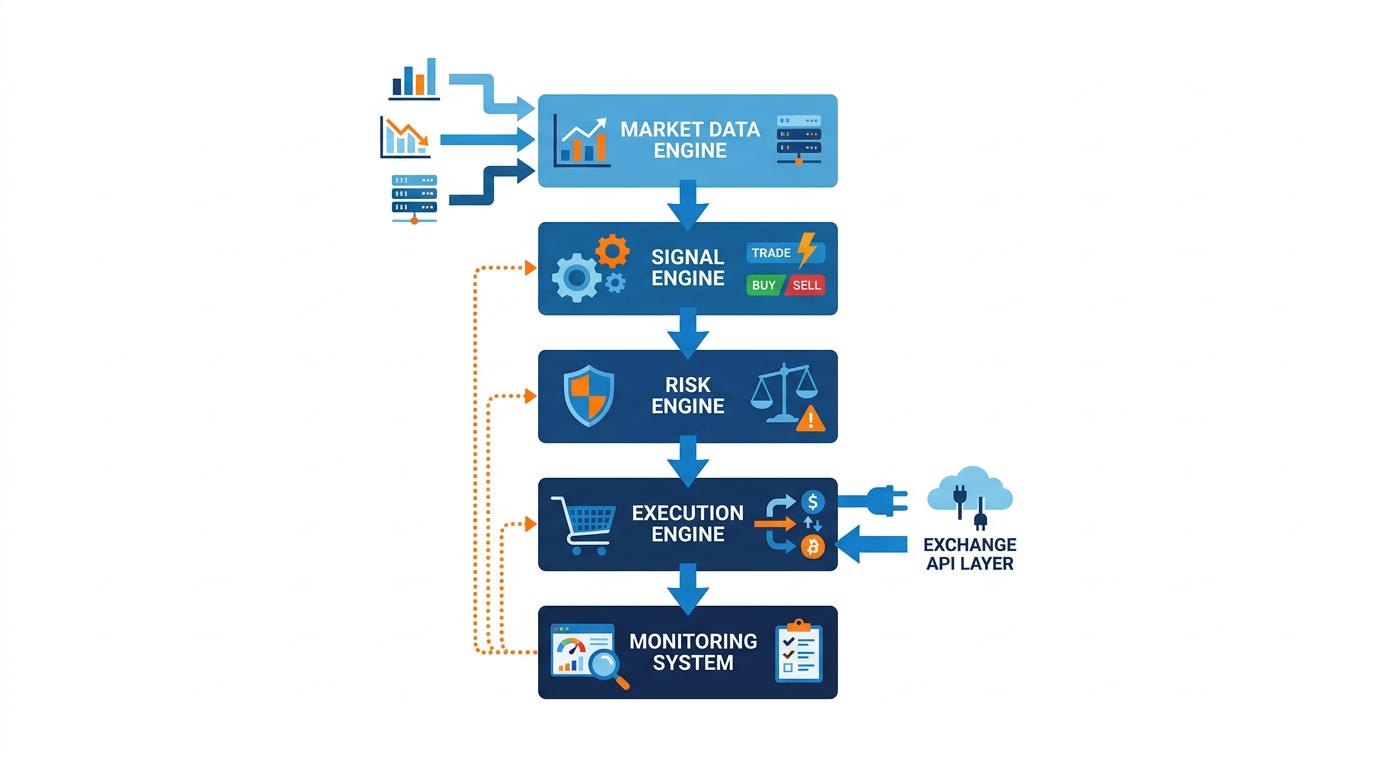
Building a Professional Execution Architecture
A scalable crypto trading system usually separates responsibilities into modules.
Example architecture:
Market Data Engine
↓
Signal Engine
↓
Risk Engine
↓
Execution Engine
↓
Exchange API Layer
↓
Monitoring & Logging
This modular structure improves:
- Scalability
- Debugging
- Reliability
- Maintainability
It also allows multiple strategies to share infrastructure.
Key Takeaways
Here are the most important lessons from this article:
- A profitable strategy can fail due to poor execution
- Execution pipelines are the backbone of professional trading systems
- Risk management is part of execution, not a separate feature
- Slippage and latency dramatically affect live profitability
- Modular architecture improves system reliability
- Logging and monitoring are essential for survival
- Real trading requires engineering discipline, not just strategy ideas
Most importantly:
Algorithmic trading is not merely predicting markets.
It is engineering systems that survive markets.
Conclusion: The Difference Between Hobby Bots and Professional Systems
The biggest shift in algorithmic trading happens when you stop thinking like a signal generator and start thinking like a systems architect.
Professional traders understand something beginners often overlook:
Execution quality is strategy quality.
The market does not reward beautiful backtests. It rewards reliable live performance.
An automated trade execution pipeline is what bridges that gap.
It transforms:
- ideas into execution,
- strategies into infrastructure,
- and simulations into real-world trading systems.
As you continue building crypto bots, focus not only on finding entries but on building resilient systems capable of surviving chaotic live markets.
Because in real trading:
The strongest edge often belongs not to the smartest predictor…
…but to the most reliable executor.
Now take the next step:
- Build a small execution engine
- Simulate realistic slippage
- Add logging and monitoring
- Test live on paper trading
- Study exchange behavior under volatility
That’s where real algorithmic trading education begins.